Hi, today I'm going to tell you how to make a IRON MAN wallpaper using Adobe Photoshop. Try to do this. Yes You Can.
Create a new file (File>New), having 1280×1024 px and 300 dpi. Applying the Paint Bucket Tool (G), it’s possible to paint the new file with black color.
Create a new layer and then apply on it the Paint Bucket Tool (G) with the color #7D5A3A
Select for this layer the next option Filter> Noise>Add Noise
Make a copy of this layer, choosing for the copy the selection from here: Filter>Blur>Motion Blur.
Place this layer under the previous one (on the layers’ palette), setting for the original layer, containing the filter Add Noise, the parameters from below. Fill 20%
Blending mode-Overlay
Merge Down layers (the copy and the original one) into a single layer (press Ctrl to mark out both layers and press Ctrl+E). Select the next option for the last layer Filter>Render>Lighting Effects.
Select the next parameters for the layer: Fill 30%
Hide this layer temporary and write the word IRON MAN, keeping the next demonstrated demands:
Because of the fact that the text has black color, we need to hide the black background.
Select the next parameters for the layer by making a mouse click on the processed layer on the layers’ palette. Blending Options>Inner Shadow
Blending Options>Outer Glow
Blending Options>Inner Glow
Blending Options>Bevel and Emboss
Blending Options>Satin
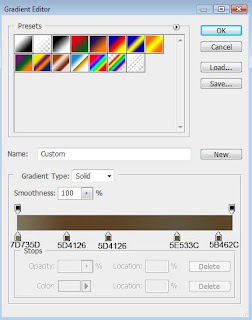
Blending Options>Gradient Overlay
Gradient’s parameters:
Make visible again the layer with the black background. The text’s layer needs to be placed upper than the background’s layer, but lower than the earlier made layer.
Press Alt button, while making a mouse click between the text’s layers and the earlier made layer (on the layers’ palette).
Next we need to combine all the layers composing the text and the two special layers into a group (press Ctrl button to mark out the corresponding layers and hold on the left mouse’s button when moving down the accentuated layers on Create a new group option).
Make a copy of the recently got group and the group’s copy need to be rasterized (mark out the group, press Ctrl+E). Place the rasterized group’s layer under original layers (on the layers’ palette). Select Free Transform option to turn over the copy.
Make a mouse click on the bottom part of the layers’ palette on Add a Mask selection. Choose the Gradient Tool (G) of black color to represent the reflection’s darkening.
Ok. Now Finished.....
This is the Full wallpaper & Download it from Here...
Thanks..


No comments:
Post a Comment
Please leave your comments about these wallpapers..